Foundations
HOW TO BUILD A FOUNDATION
Cedarshed recommends three different methods for constructing basic foundations for our cedar products:
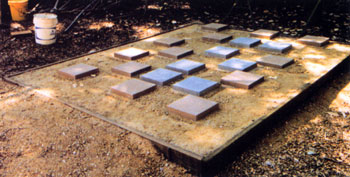
• Patio Stones
• 4x4 Pressure Treated Beams
• Concrete Slab
With all our products, we recommend the following "Step-By-Step" procedures.
|
1 / Prepare Your Site for Construction
 Before you receive your garden shed or gazebo, clear the construction area. Remove all debris, roots, grass and rocks. Make sure the ground slopes away from the site at least 10 feet in all directions. If necessary, build up the soil in the center of the site and slope away for the high point to provide drainage. Fill in any low spots within the perimeter of the site. A slope of 1/8 inch per foot is enough to prevent water accumulation.
|
|
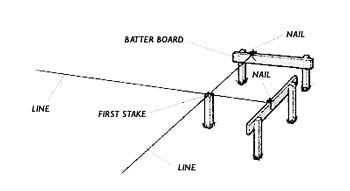
2 / Laying Out The Foundation No matter which type of foundation you’ve chosen, start by outlining the "footprint" on the site. Start by choosing one corner of the garden shed or the center of gazebo and mark it (A) by driving a stake into the ground. FOR GARDEN SHEDS 3-4-5 Triangulation Method Run a second line perpendicular to the first across point A. Mark point C 4ft. from point A. Move line AC so that the distance BC is exactly 5 ft. Angle BAC is now 90 degrees. Set up batter boards and guide lines to outline the entire shed, making right angles at each corner using the 3-4-5 triangle method described First determine door location by using one Rim Joist of Gazebo, stake points where rim joist intersects circle. Move around circle staking out all intersecting points until all corners are connected. See Specifications Sheet for Rim Joist size and radius measurement. |
|
3/ Determine The Type Of Foundation GARDEN SHEDS: Starting with one floor section, position stones around its perimeter and specific joists. (For details, see specific instruction manual) Use a 2x4 straight piece of lumber on edge and a carpenter’s level to position correctly. Add or remove soil/sand under each stone until level. Complete remaining floor sections in the same manner. When all floor panels are level with each other, flip over, screw together and place back on level foundation. GAZEBOS: Position patio stones on outline of gazebo previously described. For details of how and where stones go, see specific instruction manual. Use a 2x4 straight piece of lumber on edge and a carpenter’s level to position correctly. Add or remove soil/sand under each stone until level. When stones are level, position completed sub-structure (Rim, Long & Short Joist and Core Block) on top. Once again, use a level to confirm positioning and make any necessary adjustments. 2. 4x4 PRESSURE TREATED BEAM FOUNDATION To prevent the beams from shifting, secure them with a 1/2" inch rebar inserted through holes drilled in the beams and driven 3 to 4 feet into the ground. Leave each side or end of the foundation open to promote drainage and air circulation beneath the floor.
4x4 PRESSURE TREATED FOUNDATION Using either mix your own concrete of having it delivered by truck, ready to pour, depends on how much time and effort you have to dedicate to the project. A slab for our 8x10 foot Rancher or a 10 foot gazebo both to a depth of 4 inches will require approximately 1 cubic yard of premixed concrete. Use the following procedure: 2. Excavate the slab area to a depth 6 inches. This would put the finished slab surface 2 inches above ground (4 inches of gravel) 3. Set up your batter board strings to represent the outside face of the slab. At each corner, drop a plumb line from the intersecting strings to the bottom of the trench, then drive a 2x4 stake at this point. Using the plumb bob again, drive a nail into the top of the stake where the plumb bob touches it. Attach strings between the stakes. Using the strings as guides, drive the 2x4 form stakes around the trench perimeter, spaced on 2 foot centers. 4. Attach the form boards to the stakes with double-headed nails. Make sure the stakes are on the outside of the boards and flush with or below them. 5. Use 2x4 stakes to brace the corners of the forms. 6. Backfill the excavation with 4 inches of gravel, then lay down a plastic vapor barrier. 7. Spread or pour concrete with a rake or hoe, compacting it gently into the footing areas. Use a shovel to move concrete into footing trench. Make the pour to about 1 inch above the forms to allow for settling. Use a long 2x4 to level the concrete. Move the board in a side-to-side motion as you pull it towards you. 8. Use finishing tools, such as a bull float and trowel, to smooth the concrete surface. Allow the concrete to cure fully (seven to ten days).
|